Last updated February 12, 2026
Model Context Protocol (MCP) is an open standard that helps developers connect large language models (LLMs) to tools, services, and data sources. Heroku offers native support for MCP servers through the Managed Inference and Agents add-on, which automatically handles tool registration, execution, and orchestration.
With the add-on, you can use the Managed Inference and Agents API to view registered MCP tools and run registered MCP tools automatically. The add-on also enables you to build an MCP toolkit. An MCP toolkit is a collection of Heroku-hosted MCP servers that are accessible to your model through a unified URL. Toolkits provide a secure, centralized way to manage and run AI tools.
To use the Managed Inference and Agents API and create an MCP toolkit, deploy and then register your custom MCP servers with an add-on chat model on Heroku.
Deploy and Register Custom MCP Servers
Only deploy MCP Servers that you trust. Registering third-party MCP Servers can result in vulnerability to malicious actors.
Deploy a Custom MCP Server to Heroku
To deploy an MCP server to Heroku, create a Procfile that defines your MCP process and add any required files for your language of choice (e.g., requirements.txt for Python, Gemfile for Ruby). For examples, see our open source MCP templates.
When you deploy a standard MCP server to Heroku, you can use frameworks like LangChain with our /v1/chat/completions endpoint to make tool calls directly to your server. However, this approach requires you to:
- Build and maintain a control loop to handle tool calls from the model, execute them, and return structured responses
- Manage several different MCP servers and tool sets
- Have multi-tenant long-running SSE or streamable HTTP MCP servers, which can be less secure and costly
Instead, you can use Heroku’s Managed Inference and Agents add-on. The add-on automatically handles tool registration, execution, and orchestration. It also grants you access to the Managed Inference and Agents API and enables you to build an MCP toolkit. To use Managed Inference and Agents add-on features, register your deployed custom MCP servers with Heroku.
Register a Custom MCP Server with Heroku
You must register deployed MCP servers with Heroku to access servers and enable automatic custom tool execution through the Managed Inference and Agents API. Registration also builds out your MCP toolkit, which gives your model access to all of your Heroku-hosted MCP servers registered with that model resource through a single URL.
There are two steps to register your deployed MCP app with Heroku:
- Add a line to your MCP app’s Procfile.
- Attach your MCP app to the add-on model you want to access your server.
Heroku provides open-source MCP example repos you can modify and deploy to Heroku:
| Purpose | Repository |
|---|---|
| Ruby Code Execution | mcp-code-exec-ruby |
| Python Code Execution | mcp-code-exec-python |
| Go Code Execution | mcp-code-exec-go |
| Node Code Execution | mcp-code-exec-node |
| Document Parsing (HTML & PDF –> Markdown) | mcp-doc-reader |
These examples are standard MCP apps. They include required files (e.g. Procfile) and have an additional line in the Procfile to declare the MCP server. To deploy an example repo as is, click the Deploy to Heroku button in the README.
These tools are also available natively as heroku_tools and don’t require MCP deployment. Deployment offers additional benefits, including no upper limit on ttl_seconds for dyno runtime. You can fork the example repos to help you develop and deploy your own custom tools.
Currently, MCP servers running in Private Spaces cannot be registered or used by /v1/agents/heroku.
Add an MCP Line to a Procfile
To register, add a line to your MCP app’s Procfile that declares the MCP server. Procfile STDIO server names must:
- Start with
"mcp" - Be unique across all apps registered with your model resource
For example, Procfiles that declare MCP servers, see Heroku’s open-source MCP repos (e.g. Python Procfile).
Attach an MCP Server to an Add-on
Attaching an MCP Server gives it full access to the Heroku Managed Inference and Agents add-on. Only attach MCP Servers that you trust, because a malicious MCP Server could access all tools and data available to the add-on.
Attach your deployed MCP app to a Heroku Managed Inference and Agents chat model to grant the model access to your MCP server’s tools.
To attach a new model resource to an MCP app, run:
heroku addons:create heroku-inference:standard -a $APP_NAME --as INFERENCE
See the available AI models.
To attach an existing model resource to an MCP app, run:
heroku addons:attach MODEL_RESOURCE -a $APP_NAME --as INFERENCE
If you have an app you’re already running inference requests from, you can attach the MCP server to your app’s inference add-on to grant it access to MCP tools.
After attaching, your MCP server is automatically registered, tools synced, and requests made to /v1/agents/heroku with your model can execute your tools automatically in secure, isolated, one-off dynos.
List Registered MCP Servers
To access the Managed Inference and Agents API, retrieve your model resource’s INFERENCE_KEY and INFERENCE_URL:
export INFERENCE_KEY=$(heroku config:get INFERENCE_KEY -a $APP_NAME)
export INFERENCE_URL=$(heroku config:get INFERENCE_URL -a $APP_NAME)
List all MCP servers registered to your model with the /v1/mcp/servers endpoint:
curl "$INFERENCE_URL/v1/mcp/servers" \
  -H "Authorization: Bearer $INFERENCE_KEY" \
  -H "Content-Type: application/json" | jq .
The endpoint returns metadata about each server, including its process type, namespace, and all registered tools with their schemas and annotations. To learn more about the response format, see the /v1/mcp/servers API reference.
Execute Tools Automatically with /v1/agents/heroku
After you register an MCP server, you can include its tools in the tools parameter when you call the /v1/agents/heroku endpoint. For each tool you want your model to have access to, include a Tool Object with "type": "mcp" and the tool’s name. The tool only executes if the model chooses to call it during generation.
Example /v1/agents/heroku Request with mcp Tool
curl "$INFERENCE_URL/v1/agents/heroku" \
  -H "Content-Type: application/json" \
  -H "Authorization: Bearer $INFERENCE_KEY" \
  -H "X-Forwarded-Proto: https" \
  -d @- <<EOF
{
  "model": "claude-4-sonnet",
  "messages": [
    {
      "role": "user",
      "content": "Use the code exec tool to take the sha256 of the following string: 'Heroku Rocks'."
    }
  ],
  "tools": [
    {
      "type": "mcp",
      "name": "code_exec_python"
    }
  ]
}
EOF
You don’t need to include tool parameters, schemas, or descriptions in a /v1/agents/heroku request, because after registration metadata is included automatically.
To learn more, see the /v1/agents/heroku docs.
Example /v1/agents/heroku mcp Tool Call Response
event:message
data:{"id":"chatcmpl-184410e4ae2b7bb5180ae","object":"chat.completion","created":1748541138,"model":"claude-4-sonnet","system_fingerprint":"heroku-inf-1sefyj8","choices":[{"index":0,"message":{"role":"assistant","content":"I'll use the Python code execution tool to calculate the SHA256 hash of the string 'Heroku Rocks'.","refusal":null,"tool_calls":[{"id":"tooluse_GDSgVgflTByFOnL_ZbCrhQ","type":"function","function":{"name":"mcp-python/code_exec_python","arguments":"{\"code\":\"import hashlib\\n\\n# String to hash\\ntext = 'Heroku Rocks'\\n\\n# Calculate SHA256 hash\\nsha256_hash = hashlib.sha256(text.encode('utf-8')).hexdigest()\\n\\nprint(f\\\"String: {text}\\\")\\nprint(f\\\"SHA256: {sha256_hash}\\\")\"}"}}]},"finish_reason":"tool_calls"}],"usage":{"prompt_tokens":629,"completion_tokens":163,"total_tokens":792}}

event:message
data:{"id":"chatcmpl-184410e4ae2b7bb5180ae","object":"tool.completion","created":1748541141,"system_fingerprint":"heroku-inf-1sefyj8","choices":[{"index":0,"message":{"role":"tool","content":"Tool 'mcp-python/code_exec_python' returned result: {\"content\":[{\"type\":\"text\",\"text\":\"{\\n  \\\"returncode\\\": 0,\\n  \\\"stdout\\\": \\\"String: Heroku Rocks\\\\nSHA256: 7ebc92bcf8f51f0b623a18f0a357639410a409340043c7a670bb180acd138e6b\\\",\\n  \\\"stderr\\\": \\\"\\\"\\n}\"}],\"isError\":false}","refusal":null,"tool_call_id":"tooluse_GDSgVgflTByFOnL_ZbCrhQ","name":"mcp-python/code_exec_python"},"finish_reason":""}],"usage":{}}

event:message
data:{"id":"chatcmpl-184410e4ae2b7bb5180ae","object":"chat.completion","created":1748541146,"model":"claude-4-sonnet","system_fingerprint":"heroku-inf-1sefyj8","choices":[{"index":0,"message":{"role":"assistant","content":"The SHA256 hash of the string 'Heroku Rocks' is:\n\n**7ebc92bcf8f51f0b623a18f0a357639410a409340043c7a670bb180acd138e6b**","refusal":null},"finish_reason":"stop"}],"usage":{"prompt_tokens":947,"completion_tokens":62,"total_tokens":1009}}

event:done
data:[DONE]
Manage MCP Servers
You can view and manage your registered MCP tools with the CLI or in the Heroku dashboard.
Run this CLI command:
heroku addons:open INFERENCE -a $APP_NAME
Alternatively, in your dashboard:
- Click your app to open it.
- Select the
Resourcestab. - Select the Managed Inference and Agents add-on under
Add-on Services.
Use Registered Tools With External Clients
External AI applications like Cursor provide the ability to integrate with MCP servers via configuration files. To integrate an external AI application with your deployed and registered Heroku mcp tools:
Run this CLI command to open your add-on in the Heroku dashboard:
heroku addons:open INFERENCE -a $APP_NAME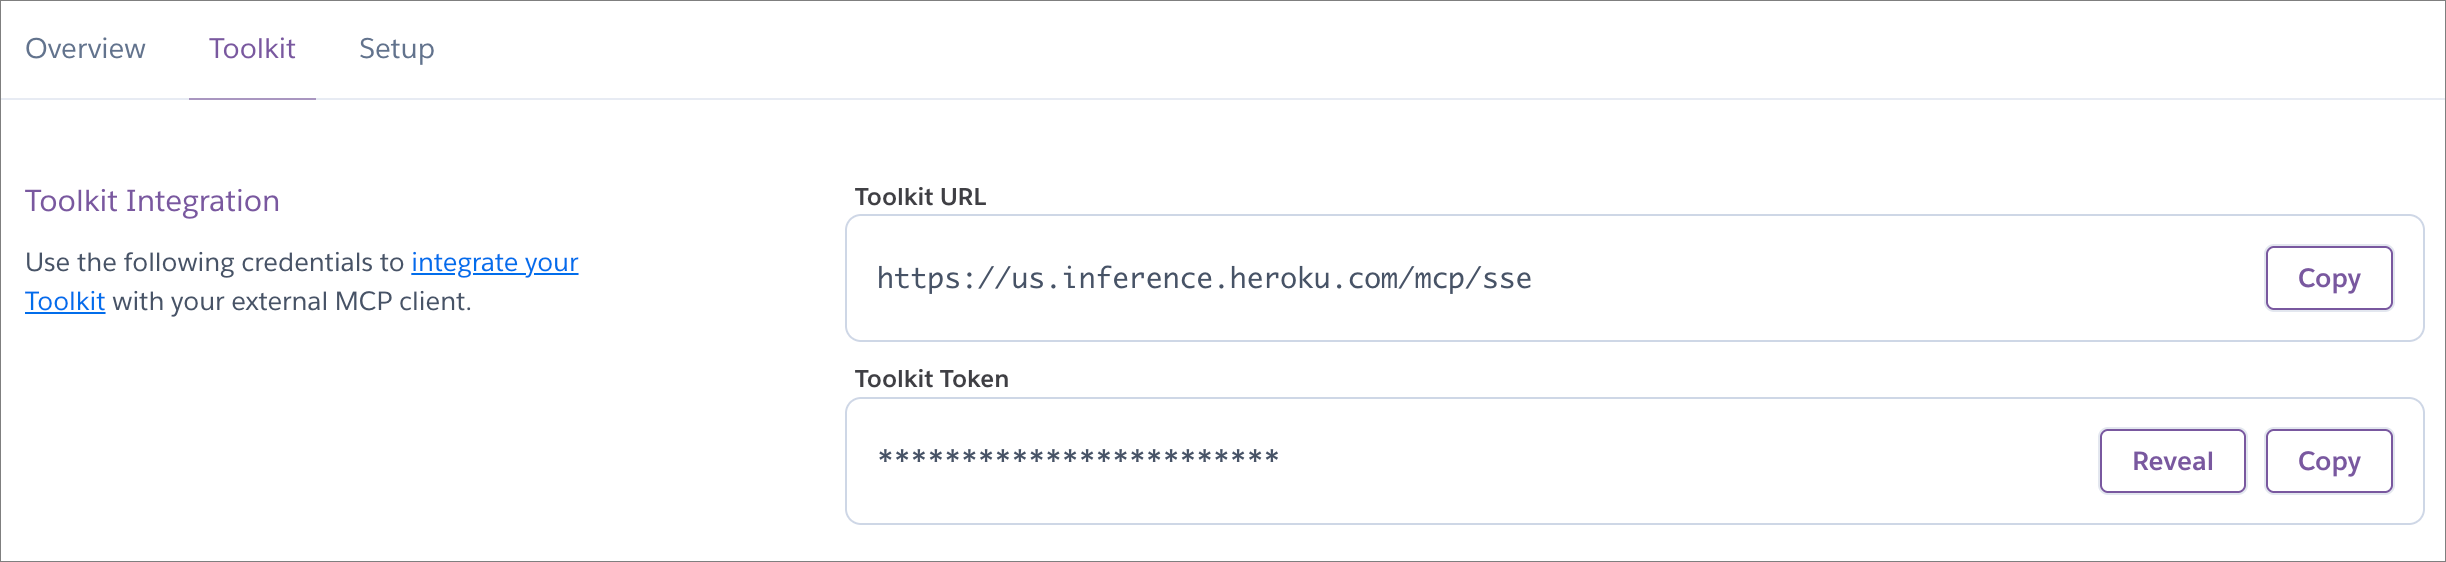
Copy the
Toolkit URL($INFERENCE_URL/mcp/sse) andToolkit Token($INFERENCE_KEY).Add the
Toolkit URLandToolkit Tokento your client’s configuration file.
For example, in Cursor, your .cursor/mcp.json might look like this:
{
  "mcpServers": {
    "myCustomTools": {
      "command": "npx",
      "args": [
        "mcp-remote",
        "<YOUR-TOOLKIT-URL>",
        "--header",
        "Authorization:${AUTH_HEADER}"
      ],
      "env": {
        "AUTH_HEADER": "Bearer <YOUR-TOOLKIT-TOKEN>"
      }
    }
  }
}
Test Registered Tools with MCP Inspector
You can test deployed MCP servers with MCP Inspector:
Run this command:
npx @modelcontextprotocol/inspectorOpen the locally hosted UI (typically
http://127.0.0.1:6274).Select
SSEunderTransport Typein the left pane.Under
URL, add$INFERENCE_URL/mcp/sse(e.g.https://us.inference.heroku.com/mcp/sse).Select
Authenticationand add your model add-on’s$INFERENCE_KEYas theBearer Token.Click
Connect.
You can now list your tools and make example requests in MCP Inspector.
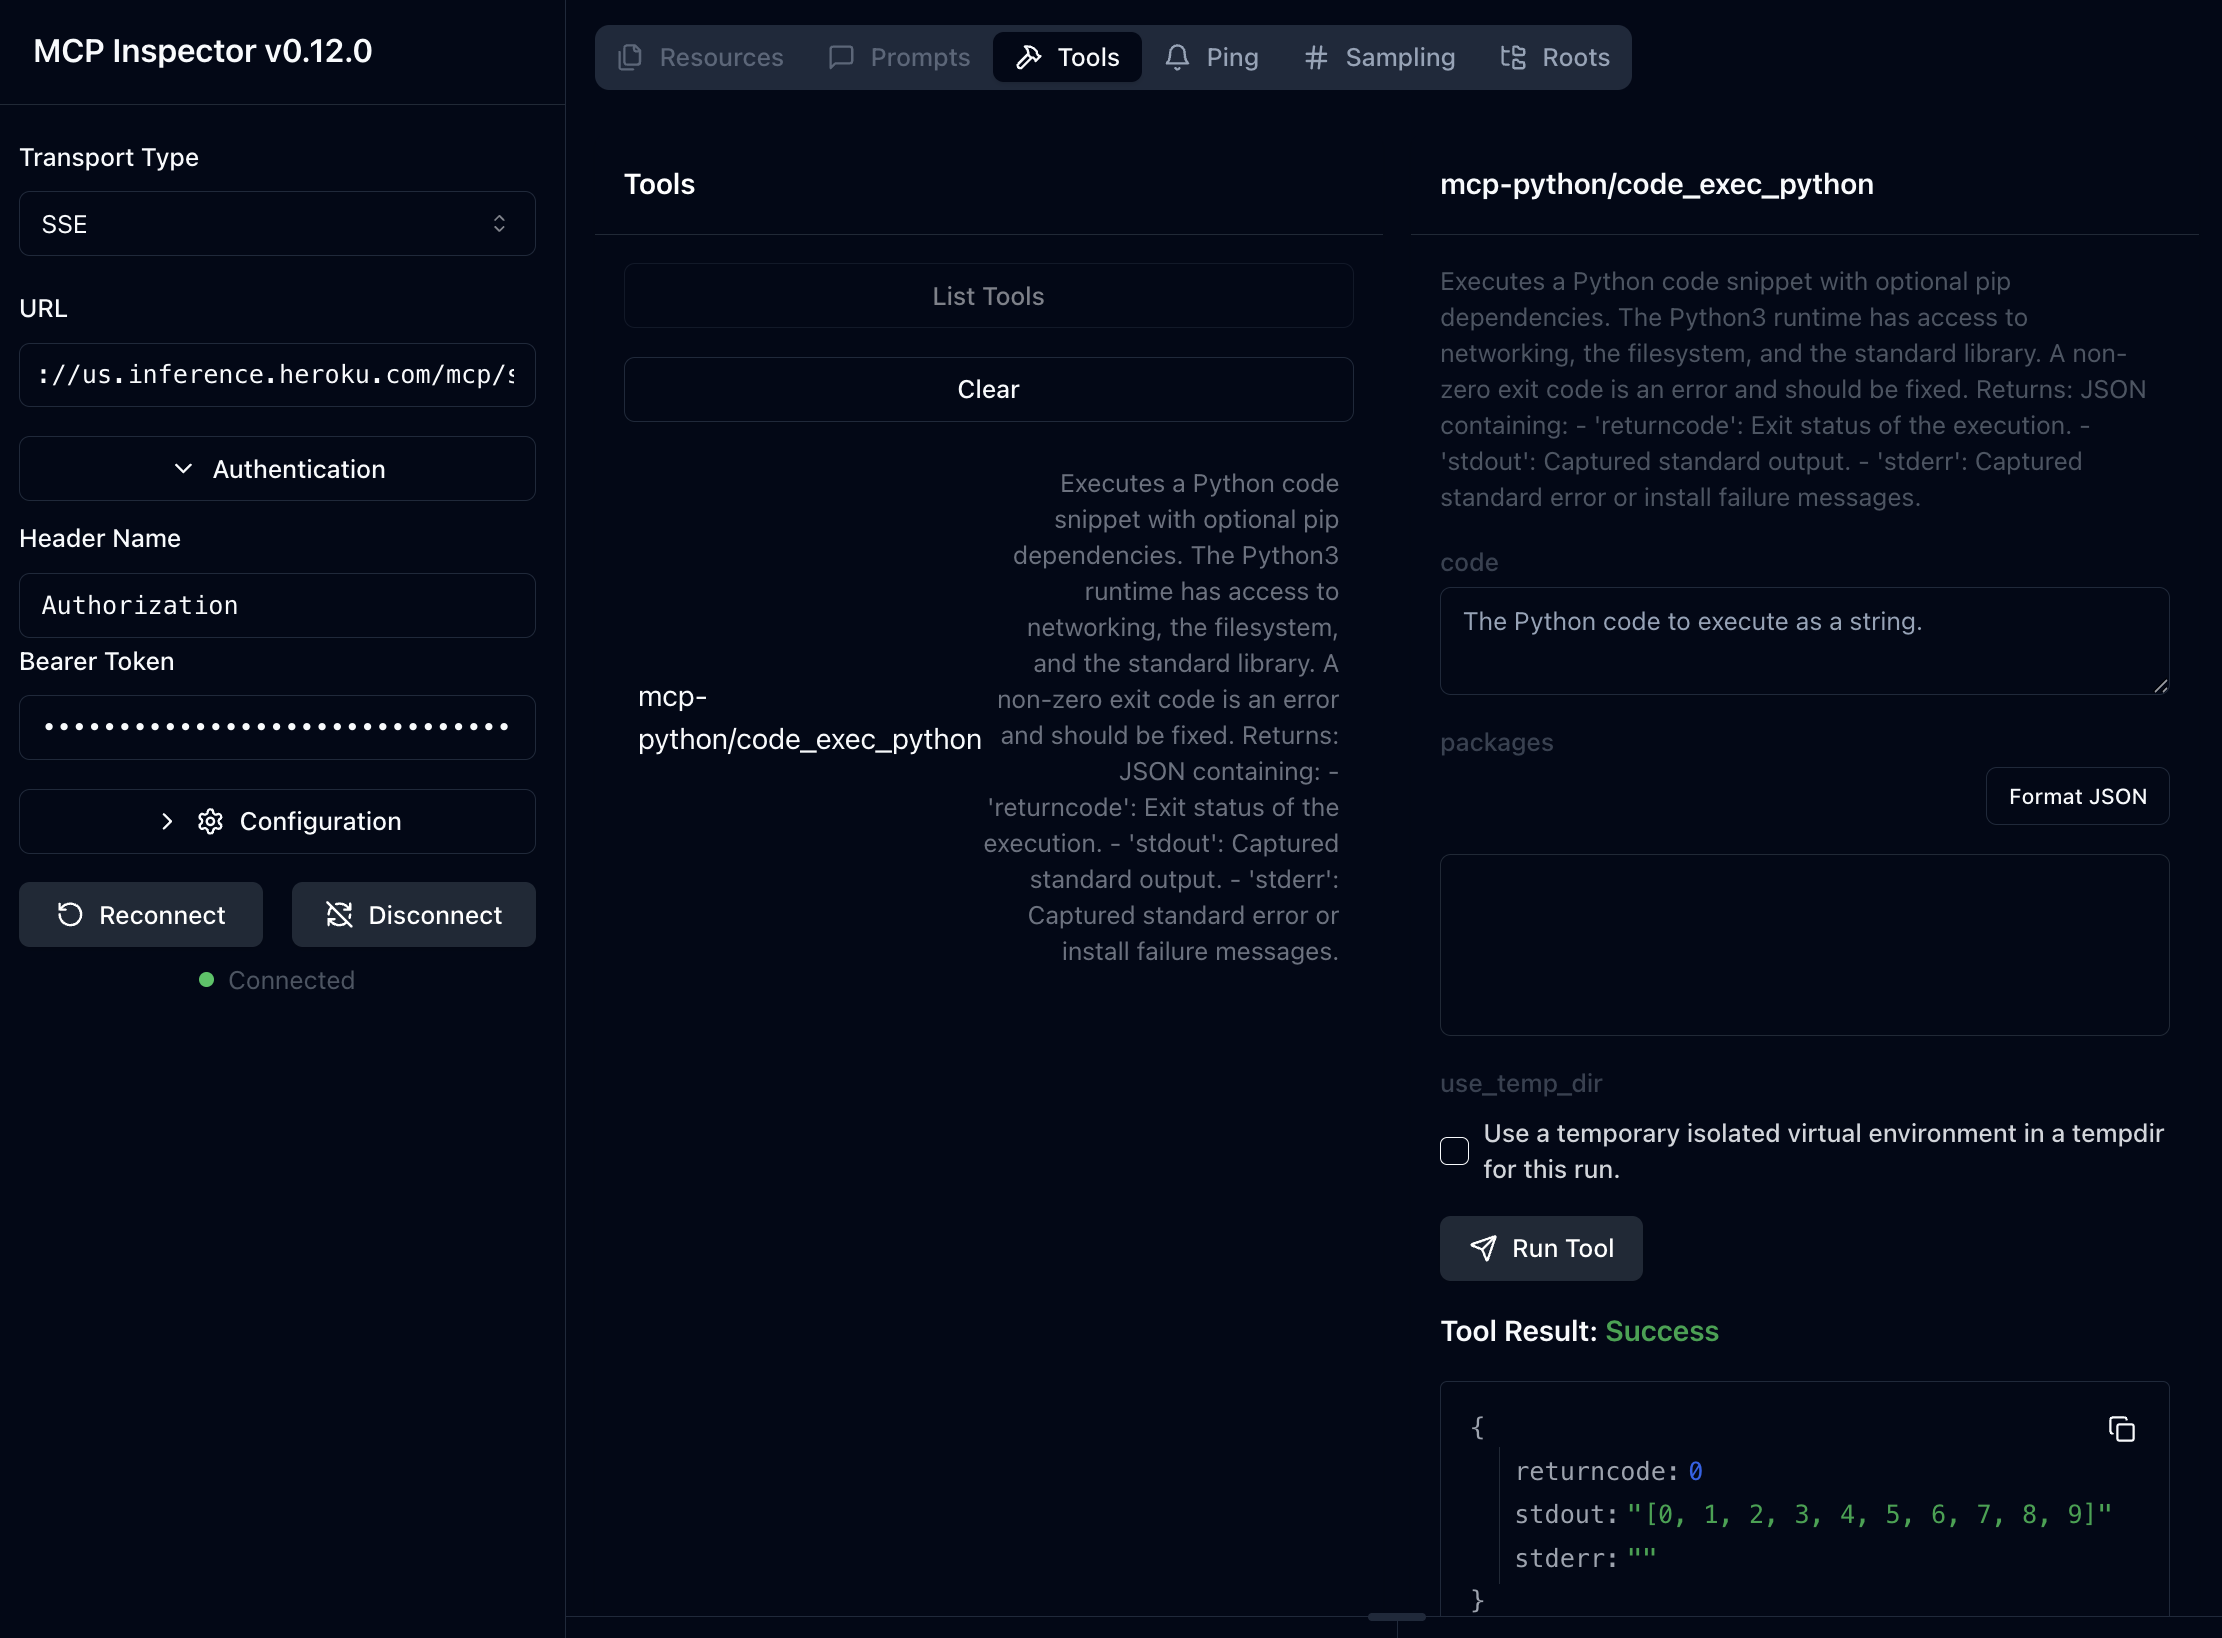
The MCP Inspector interface uses SSE, but underlying tool call executions are run in secure, isolated, one-off dynos (STDIO mode).